


AIIMS NORCET 6 IMAGE SIZE AND THUMB SIZE INSTRUCTIONS
Guidelines for Scanning Photograph, Signature and Left Thumb Impression
Photographs obtained through following modes are acceptable:
- Through digital camera/webcam.
- By scanning a physical photograph
Guidelines for capturing photo through digital camera/webcam
1. Set the resolution of the digital camera/webcam to highest value.
2. Hold the camera Vertically and click the photo having white background.
3. Photograph must be clicked in appropriate light conditions so that face should be clearly visible against white background.
4. Crop the captured photo having face and upper body part like a passport photo.
5. The size of image should be between 50-100 kb. If the size of the image is more than 100 kb resize the image to required size.
(Click here to know how to resize an image)
Guidelines for Scanning Photograph Image
1. Photograph must be a passport size colour photograph without border and clearly showing the face.
2. Photograph must be a recently clicked or should not be more than 6 months old. The dimension of photograph must be 3.5*4.5 cm (width*height).
3. Photograph must be clicked in colour with white background only.
4. Draw a box of 3.5*4.5 cm (width*height) on A4 white paper sheet and paste the photo in the box.
5. Scan the box with photograph pasted in it, not the whole paper sheet. Save the image as .jpg/.jpeg/.gif/.png image image
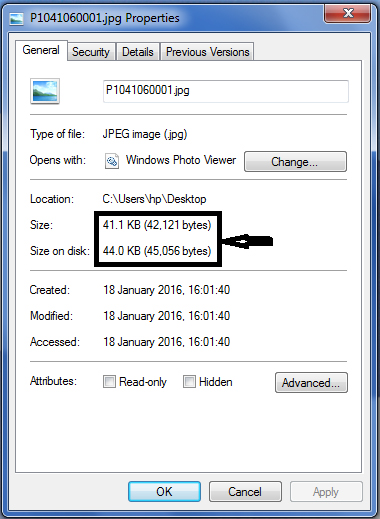
6. The size of image should be between 50-100 kb. Size of the image can be checked by right click on the image and then go to “Properties” link.
7. If the size of the image is more than 100 kb, then adjust the settings of scanner such as set the dpi of the scanner to 200 dpi and quality of image at low. If image size is still more than 100 kb then resize the image to the given specifications. (Click here to know how to resize a scanned image)
Check for the following before uploading the photograph File:
1. Photograph should be colour with white background.
2. Size of the image should be between 50-100 kb
3. Scanner dpi should be 200 dpi.
4. Image should be in .jpg/.jpeg/.gif/.png format.
Guidelines for Scanning Signature
1. Draw a box of 6*3 cm (width*height) on a white paper sheet.
2. Take a thick tip black/blue ink pen (preferably fountain pen).
3. The applicant has to put his/her signature in full in the box drawn.
4. Following king of signatures are NOT acceptable:
- Signature containing Initials only
- Signature in CAPITAL LETTERS
- Signature with overwriting
5. Signature must be signed by the applicant, not by any other person.Signature should be done in the center of the box.
6. Scan the box with signature only, not the whole sheet. Save the signature as .jpg/.jpeg/.gif/.png image.
7. The size of image should be between 10-50 kb. Size of the image can be checked by right click on the image and then go to “Properties” link.
8. If the size of the image is more than 50 kb, then adjust the settings of scanner such as set the dpi of the scanner to 200 dpi and quality of image at low. If image size is still more than 50 kb then resize the image to the given specifications. (Click here to know how to resize a scanned image)
Check for the following before uploading the Signature File:
1. Signature should be clear and without overwriting on a white paper sheet within a box of 6*3 cms (width*height).
2. Size of the image should be between 10-50 kb
3. Scanner dpi should be 200 dpi.
4. Image should be in .jpg/.jpeg/.gif/.png format.
Guidelines for Scanning Left Thumb Impression
1. Draw a box of 4*3 cm (width*height) on a white paper sheet.
2. Put your left thumb on a blue/black ink pad. Ink should have covered your entire thumb.
3. Put your left thumb print in the box drawn on paper sheet. Do not press thumb too hard.
4. Thumb print should be clear such that the lines of thumb can be clearly seen by naked eyes.
5. Scan the box with thumb print only, not the whole sheet. Save the thump print as.jpg/.jpeg/.gif/.png image.
6. The size of image should be between 10-50 kb. Size of the image can be checked by right click on the image and then go to “Properties” link.
7. If the size of the image is more than 50 kb, then adjust the settings of scanner such as set the dpi of the scanner to 200 dpi and quality of image at low. If image size is still more than 50 kb then resize the image to the given specifications. (Click here to know how to resize a scanned image)
Check for the following before uploading the Left Thumb Impression File:
1. Thumb Print should be in blue/black ink, clear, complete and put on a white paper sheet within a box of 4*3 cms (width*height).
2. Size of the image should be between 10-50 kb
3. Scanner dpi should be 200 dpi.
4. Image should be in .jpg/.jpeg/.gif/.png format.
Guidelines for checking the parameter of a Scanned Image Checking the parameters of an image:
- Right click on the image to be uploaded, go to link “Properties”.
- A window opens up having all information about the image. See given below Fig.1
3. Click on “Details” tab to view the dimensions (width & height) and resolution of the image. See given below Fig.2

Upload PhotoPhotograph once uploaded cannot be changed, unless rejected by AIIMS.

The uploaded photograph is not more than six months old.Background colour of photograph is white.Photograph is not blurred.Photograph size is as per instructions.This Photograph is mine.

Sample Image
Instruction for photo upload:
1. Photograph must be a passport size colour photograph without border and clearly showing the face.
2. Photograph must be a recently clicked or should not be more than 6 months old. The dimension of photograph must be 3.5*4.5 cm (width*height).
3. Photograph must be clicked in colour with white background only.
4. Draw a box of 3.5*4.5 cm (width*height) on A4 white paper sheet and paste the photo in the box.
5. Scan the box with photograph pasted in it, not the whole paper sheet. Save the image as .jpg/.jpeg/.gif/.png image
6. The size of image should be between 50-100 kb. Size of the image can be checked by right click on the image and then go to “Properties” link.
7. If the size of the image is more than 100 kb, then adjust the settings of scanner such as set the dpi of the scanner to 200 dpi and quality of image at low. If image size is still more than 100 kb then resize the image to the given specifications.
Upload SignatureSignature once uploaded cannot be changed, unless rejected by AIIMS.

Background colour of signature is white.Signature is not blurred.Signature size is as per instructions.This Signature is mine.

Sample Signature
Instruction for Signature upload:
1. Draw a box of 6*3 cm (width*height) on a white paper sheet.
2. Take a thick tip black/blue ink pen (preferably fountain pen).
3. The applicant has to put his/her signature in full in the box drawn.
4. Following king of signatures are NOT acceptable:
- Signature containing Initials only
- Signature in CAPITAL LETTERS
- Signature with overwriting
5. Signature must be signed by the applicant, not by any other person.Signature should be done in the center of the box.
6. Scan the box with signature only, not the whole sheet. Save the signature as .jpg/.jpeg/.gif/.png image.
7. The size of image should be between 20-100 kb. Size of the image can be checked by right click on the image and then go to “Properties” link.
8. If the size of the image is more than 100 kb, then adjust the settings of scanner such as set the dpi of the scanner to 200 dpi and quality of image at low. If image size is still more than 50 kb then resize the image to the given specifications.
Upload Left Thumb ImpressionLeft Thumb Impression once uploaded cannot be changed, unless rejected by AIIMS.

Background colour of Thumb Impression is white.Thumb Impression is not blurred and lines are clearly visible.Thumb Impression size is as per instructions.This Thumb Impression is mine.

Sample Thumb Impression
Instruction for Thumb Print upload:
1. Draw a box of 4*3 cm (width*height) on a white paper sheet.
2. Put your left thumb on a blue/black ink pad. Ink should have covered your entire thumb.
3. Put your left thumb print in the box drawn on paper sheet. Do not press thumb too hard.
4. Thumb print should be clear such that the lines of thumb can be clearly seen by naked eyes.
5. Scan the box with thumb print only, not the whole sheet. Save the thump print as.jpg/.jpeg/.gif/.png image.
6. The size of image should be between 20-1000 kb. Size of the image can be checked by right click on the image and then go to “Properties” link.
7. If the size of the image is more than 100 kb, then adjust the settings of scanner such as set the dpi of the scanner to 200 dpi and quality of image at low. If image size is still more than 50 kb then resize the image to the given specifications.

Leave a Reply